Display
After an easy one, it's time for a slightly more difficult code.
In this example, we'll see how to make a green circle on the screen that bounces off the edges.
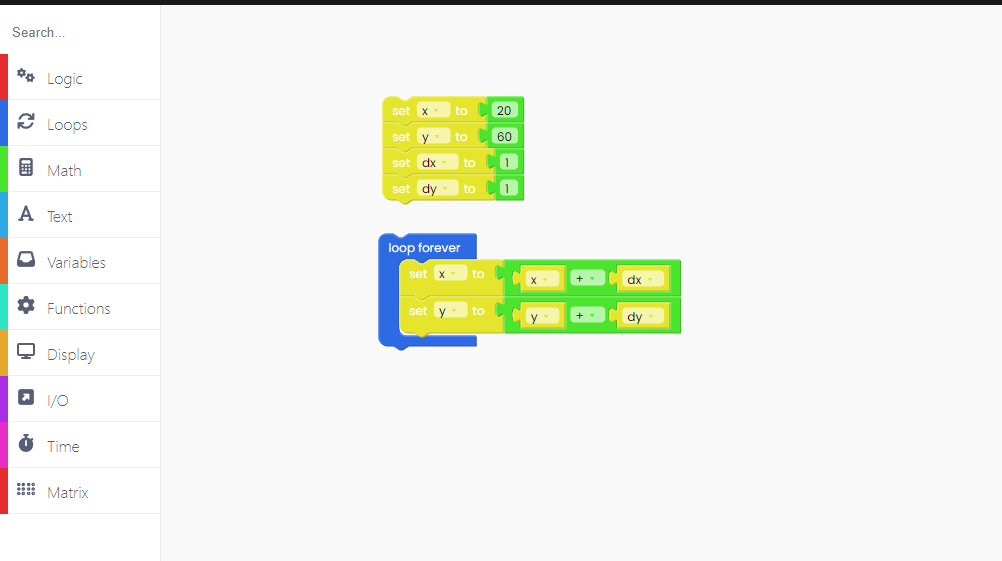
To begin, we must create four variables (x, y, dx, and dy).
X and Y represent the coordinates of the center of the circle, and DX and DY represent the amount by which the x and y coordinates move.
X and Y are the coordinates of the circle's center, while DX and DY are the amounts by which the x and y coordinates change.

Now, let's introduce the "loop forever" block, which will include all of the code that will run continuously.
We'll set the 'x' and 'y' to 20 and 60, and they'll always change by one, therefore the 'dx' and 'dy' must be set to 1.

Every 20 ms, the 'x' and 'y' variables will change by one.
As a result, we must set the value of these variables to the sum of that variable's value and 1.

When the circle reaches the display's edges, it will begin to shrink in size.
Because of that, we have to change its direction.
We do that with the "Logic" block.

So, whenever the circle reaches the edges, we chose to change the variable 'dx' to -'dx'.
The same goes for the 'y' and 'dy' variables.

Great!
The only thing left to do is draw a circle.
To do that, first we have to fill the background of the display with black:

Draw the filled circle in color green.
The radius of our circle is set to 5, and the x and y coordinates are set to the initial values of these variables.

To ensure that this circle appears on the display, add the "push frame" block at the end.

And, finally, add the time block "sleep 20 ms".

Click on the Run button and check it out!
In this example, we'll see how to make a green circle on the screen that bounces off the edges.
To begin, we must create four variables (x, y, dx, and dy).
X and Y represent the coordinates of the center of the circle, and DX and DY represent the amount by which the x and y coordinates move.
X and Y are the coordinates of the circle's center, while DX and DY are the amounts by which the x and y coordinates change.

Now, let's introduce the "loop forever" block, which will include all of the code that will run continuously.
We'll set the 'x' and 'y' to 20 and 60, and they'll always change by one, therefore the 'dx' and 'dy' must be set to 1.

Every 20 ms, the 'x' and 'y' variables will change by one.
As a result, we must set the value of these variables to the sum of that variable's value and 1.

When the circle reaches the display's edges, it will begin to shrink in size.
Because of that, we have to change its direction.
We do that with the "Logic" block.

So, whenever the circle reaches the edges, we chose to change the variable 'dx' to -'dx'.
The same goes for the 'y' and 'dy' variables.

Great!
The only thing left to do is draw a circle.
To do that, first we have to fill the background of the display with black:

Draw the filled circle in color green.
The radius of our circle is set to 5, and the x and y coordinates are set to the initial values of these variables.

To ensure that this circle appears on the display, add the "push frame" block at the end.

And, finally, add the time block "sleep 20 ms".

Click on the Run button and check it out!
If you want to put the stock firmware back onto your device, you can click the Restore firmware button in the top right corner on CircuitBlocks.


